Wednesday, March 16, 2011

Glaze Test Results

My original plan for the textile design on the hand was to use a spray gun to apply Sudee blue, and then wax resist the design over and apply a couple of layers of Varda’s Brown. That is what these test tiles were investigating. I dipped them and varied the thickness, but there is not much of a noticeable change.


I also tested some glazes for the recesses. These are blue Majolica and Sudee Yellow dipped twice. The one on the right has a layer of suede yellow underneath the Majolica.


This is an under-glaze pencil test tile, but I painted on the sudee yellow which made it smear some. The best application of glaze for under-glaze pencil is with a spray gun or dipping.


My test tiles for the decals I used on the base started out ink black, but after the firing they came out a reddish color (because of the iron in the ink?). White Majolica was applied underneath.


Glaze Test Results

Blue Majolica w/Majolica Base brushed on

Excellent Black w/Majolica Base brushed on

Excellent Black w/Majolica Base brushed on

Majolica Base

Blue Majolica w/Majolica Base brushed on

Blue Majolica w/Majolica Base brushed on

Excellent Black w/Majolica Base brushed on

Clear Olive Green with Majolica base brushed on

Clear Olive Green with Majolica Base brushed on

Majolica Base

Excellent Black w/Majolica Base brushed on

Excellent Black w/Majolica Base brushed on

Blue Majolica w/Majolica Base brushed on

Excellent Black w/Majolica Base brushed on

Excellent Black w/Majolica Base brushed on

Excellent Black w/Majolica Base brushed on

Excellent Black w/Majolica Base brushed on

Excellent Black w/Majolica Base brushed on

Excellent Black w/Majolica Base brushed on

Tuesday, March 15, 2011

A Tree of Music


Music has always been very important to me, and in a way has been one of the most lasting constants in my life. over the years it has been a source of joy, and sometimes anguish. It has helped me reach out to other people, and it has sometimes been a factor to limit the level of interaction between someone and myself.


Many of the stereo components I use were born in the seventies, and were constructed in the manner of the period. This means most of the components are encased in boxes made of beautiful finished wood, electronic precision engaged in a symbiotic relationship with preserved organic elegance. These days almost all stereo equipment is made completely of plastic and apparently designed to be non-imposing and characterless, meant to be heard but not seen if you will. To compound the complete lack of passion that i think is now associated with the in home music listening experience is the near loss of distinct seperate components to be chosen with care and consideration by the user, and then arranged and enjoyed in a special place. Instead a purchaser buys a single all in one device, often placing ease of connection with a music reproduction source higher in importance than sound reproduction quality.


(all of the clay used in this construction is low-mid fire earthenware, and the slips, glazes, and iron washes are LSU shop recipes)


CONSTRUCTION


  1. The first thing i did was layer several plastic wet slabs of clay around a cardboard packing tube and positioned it vertically so that the clay could dry out a little bit and set. I flared out the bottom of the sleeve of slabs and manipulated them such that they would resemble the buttom of a tree where it makes the transition to the roots. I used a cardboard tube so that it would wick moisture from the clay to promote drying, and at the same time not stick to the clay.


  2. Next i mounted the leather hard tree trunk on a leather hard rectangle, which would become the top of speaker assembely which sits atop the mock amplifier. Once the tree was mounted on the slab i proceeded to make a box out of thin slabs. This box has a base of the same dimensions as the piece on the bottom of the tree. i then sculpted additional clay onto the sides of the box to act as the continuations of the trees roots downward.


  3. At this point I began work on the 2 drawers in the above mentioned box whose front faces would resemble the fronts of speakers. the drawers are constructed basically as 5 sided boxes made of thin slabs fused together by means of a techneque often refered to as scoring and slipping in which wet clay is scratched to make cuts, and then moisture is applied in the form of very wet clay or water. the two surfaces are then pressed together and wiggled for best results. I made mock speaker cones, and horns, and finished them off with an application of sliptrailed green slip dots to resemble the fronts of a pair of speakers I own that i recieved from my father. the bottom sides and back of the drawers were treated with a serier of concentric circles to look like the surface of a phonograph record.


  4. i cut off the top of the slap constructed tree trunk and made a cap the size of the opening on top i assured that the cap was the same size and shape as the oputide of the tree and placed a coil on the inside of the underside of the cap, so that it would not shift. in addition i made a cut in the tree trunk, and added clay to the cap in a wedge shape to fit the created void which i sculpted to resemble a crack in the log. this feature has the functionality of acting as a key.


  5. with the tree trunk/speaker housing box having been resting under plastic for several days it was now at a uniform leather hard stage, so i could begin to consider the surfaces. i used several things to carve what resembles a wood grain pattern into the trunk of the tree and down the roots, as well as a similar design on the sides of the speakers. i then covered all of the work with plastic loosely so it could all dry.


  6. the final component of the assembely was a wider and shorter box with drawers that speaker tree would sit atop. this new part would resemble a tuner/amplifier. the bow was made in much the same way as the previously mentioned boxes, only this time due to the large sizes of the slabs compared to thier thickness i added coils to the inside of every joint to strengthen the connections. the box has a vertical support slab wall inside positioned such that it would act as a load bearing wall when the speakers were stacked. the back of the amplifier was then furnished with holes, to parallel vent holes on a real amp.


  7. the drawers were next, constructed in the same maner as the previous drawers, only with added coils for strength. on the front of the smaller left drawer i fashioned a volume knob by sculpting clay around a plactic bottle cap and then attaching. then the drawers were accented with slip trailed lettering and a mock am/fm tuner.


  8. once all of these components were once fired to cone 04 i turned my attention to the surface treatements. the main trunk of the tree was treated by using a slip trailer to trail an offwhite crawl glaze into all of the wood grain texture lines, then i brushed the whole tree part with an iron wash with some #6600 mason stain added. 6600 settles out very quickly, making for an inconsistent coloration pattern, which works for an organic surface such as a tree trunk. the walls of the speakers were treated with just an iron wash with no 6600, and the speaker cones and horns were brushed with an Andrew Martin black stain recipe. then all of these components were sprayed with a lowfire clear glaze.


  9. the bottom amp box was treater by fitst spraying the top sides and back with a black glaze, and then glaze trailing the crawl in a wood pattern on the sides. then i sprayed the front of the amp drawers with a clear lowfire glaze.


  10. at this point i stached the pieces in the fashion shown in the photographs and brushed a white majolica onto the back of each piece connecting the two as speaker wires. with the two stacked i then proceeded to fire the piece with the drawers seperate, but the speakers on top of the amp, so that the two would fuse together with glaze.


  11. the outcome of the final piece was actually very successful i think. the construction all held up despite fairly thin fragile components and most of all the glaze and stain applications were a huge success. i think this was undoubtedly due to the careful testing of each glaze compination, and the reproduction of application techniques.

Monday, March 14, 2011

How to Make Camera Bag Reliquary

As a little back story, I am extremely devoted to photography, and wanted to exemplify that via this reliquary assignment.

1.  Begin by rolling out a slab of clay (MC 109) using either a slab roller (common slab rolling tool) or a basic rolling pin so that the resulting slab is 1/4 inch thick.  Make sure to use enough clay that a 20" x 12".

2.  Repeat. These slabs will be the front and back plates of the bag.

3.  Decide which slab will be the front plate, then using a 5" PVC pipe as a guide, cut two 5" holes in the front plate that are evenly spaced with two inches between the holes and the bottom side and the near vertical edges.

4.  While these two slabs are drying, create two more slabs using the same process that are also 20" x 12". These will be the top and bottom plates.

5.  Finally, make two more slabs that measure 12" x 12". These, as you might guess, will be the remaining sides.

6.  Make two slabs that are 11" x 15 3/4". These will be the cavities that the drawers will slide into.

7.  Gently wrap one of the slabs around the 5" PVC pipe, then join the two edges together by scoring both sides (see step 8) and smooth the joint, then lower the pipe into one of the holes in the front plate.

8.  The drawer cavity and the front plate will now be joined.  The edges of both parts where they will meet will need to be scored, which means that a knife or other ceramic cutting tool should be used to make small incisions across the surface of the surfaces that will be joined.  Do not cut all the way through. These incisions are to help the surfaces attach to each other.

9.  Once the two surfaces have been scored, gently pinch clay from both parts together and work the clay together so that they eventually form one solid unit. Smooth the edge with the soft pad of your thumb or a soft rubber rib (a common clay tool that can be found with most other clay tools).

10.  Leave the drawer cavity in its vertical position until it is firm enough to support this orientation on its own.  Once this happens, repeat steps 7 & 8 for the remaining drawer.  Once both drawers are drying in the vertical position, small braces will need to be made to attach to the cavities so the drawer will not fall when shifted into a horizontal orientation.  These should be the same height as the distance between the bottom of the drawer opening to the front plate's base.  Attach these using the scoring method mentioned in earlier steps.

11.  While waiting for the drawer cavities to set, the remaining vertical plates can be attached to the base plate. (Provided they are hard enough to bend comfortably, but stand in a set position with foam braces).

12.  Use the same scoring technique as before to attach these plates, but in this case, the clay will be more difficult to pinch together in its state of dryness.  This calls for an application of slip.  Slip is a mixture of clay and water.  Mix a few ounces of clay with water until the clay is about the consistency of peanut butter.  Now use this compound to assist in attaching the vertical plates to the base plate.  Large, soft foam blocks may be implemented to keep the plates in a vertical position while attaching.

13.  Once attached to the base plate, bend as desired to imitate folds of a bag.

14.  Attach vertical plates to each other using scoring and slip as before.  This step will require some creativity, as the folds must match each other where the attachment is made.

15.  By this time, the drawer cavities should have set up long enough to be able to move with the front plate.  Carefully move the front plate into position, and lower the drawer cavities into their horizontal positions.

16.  Now the front plate can be attached to the the base plate and the other vertical plates.  Use the same scoring and slipping method as before to do this.

17.  Now retrieve the top plate of the sculpture.  Provided that the vertical plates are strong enough (dry enough) to hold its weight, gently lower it onto the vertical plates.  If the top plate is too wet, it will fall into your sculpture.  If it is too dry, it will be impossible to attach to the vertical plates.  Wet towels can be wrapped around the edges of the plates to maintain a certain level of moisture.  Use this method to keep the plates in the most desirable state of dryness.

18.  Slip and score to attach the top plate to the vertical plates.

19.  Now the actual drawers can be assembled.  Using a PVC pipe that is at least one inch smaller than the pipe used to create the cavities, dry two equally sized slabs that will become your drawers.  These slabs will wrap only half way around the pipe and will be 10 inches long.

20.  Keep one end of the drawers slightly moist for the drawer plate attachment.

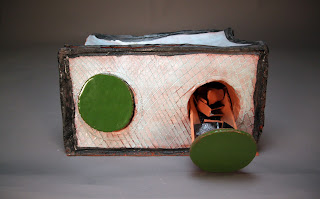
21.  Cut two 6" x 1/4" thick circles to become the front plates of the drawers.

22.  The same attaching method used for the drawer cavities can be used to attach the drawers to the drawer plates.

23.  When the main sculpture and drawers are in a state of leather hardness, designs may be carved into the surfaces using any number of clay tools.  I used mostly a needle tool, and a metal hook to carve away the larger grooves.

24.  The sculpture is now ready to go into the kiln to be bisque fired.

25.  Post bisque firing, glazes can be applied.  I applied blue majolica to the main plates, edged it with excellent black, and clear olive green was applied to the drawer faces.  All glazes were applied with brushes, and were given at least three coats.

26.  Now the piece may be glaze fired.  Enjoy your new reliquary.

Saturday, March 12, 2011

Bubbly Seascape Reliquary

First of all, WHAT IS A RELIQUARY?!!!?!?!?!??!

According to the Free Dictionary by Farlax:
rel·i·quar·y (rl-kwr)
n. pl. rel·i·quar·ies
A receptacle, such as a coffer or shrine, for keeping or displaying sacred relics.


The object I chose was a small piece of coral from a year I spent in Hawaii that I hold near and dear to my heart. This small item is what I based my entire concept on. A bubble, I think has an amazing volume to it and I decided this would be the perfect vessel in my project. On of the challenges was to create a space large enough for 20 test tiles to sit; a bubble is the perfect object to manipulate because they come in tons of sizes and shapes! Check out this crazy video! (watching in HD is the best)


To add interest and character I added 2 different types of coral around the base of the work along with thin blades of seaweed, rippling and swaying in the water and around the bubble(s). I was determined to create a piece that was interesting in the round and I used these additions along with some "baby" bubbles to keep my viewers interested and investigating the entire reliquary.

How To Build the ________ :

First step in the process is to prepare your clay so it's ready to do exactly what you want it too. As we all learn clay takes experience to get an understanding of what it will and will not do at certain moistures, along with rewetting or letting your clay dry out a little. practice and experience is definitely the best way to gain knowledge about how clay moves and adjusts. I like my clay a little more wet than not, because A) it's a process to rewet your clay & B) you can always let clay dry out a little while you work in other areas.

The Base and Hidden Box

For the base and small drawer I rolled out slabs about 1/4 inch thick. I cut out a curvy rhombus shape out and kept it moist in plastic that way I' still be able to attach pieces to it. The box was made out of hard slabs (stiffer clay). I cut out 4 walls since i would be using the base as the bottom and the top would be covered by the bubble. I pressed the back of a wooden tool I have in rows spaced out, and went back through lining it up so it had an alternating pattern that created a sweet fishy scale effect.
Once I had the entire effect on all four sides, I cut out a small box to use as the face of my drawer so that the pattern would match up perfectly. Using that small square I cut out another a tad bigger to make sure the drawer couldn't come completely out. And the I eye-balled it to make sur the drawer would fit completely with the back and front attached to cut out the side pieces. Scoring and slipping I attached all the pieces, building the drawer into the the box. Next, I scored and slipped the box to the base and I was good to go!

The Big Ole' Bubble


To make the bubble portion I stuck with a coil pot. By spraying down the canvas like I mentioned earlier I kept my coils nice and moist which aided in really smoothing the surface and joining the layers together. The coils I rolled out were had about a 1/2 inch diameter and would be anywhere from 12 inches to 18 inches long depending on how much clay I grabbed. To fluxuate the shape and size up the pot I placed my coils further outside or inside of each other and also took advantage of how the clay moved with i compressed the coils. Using a serraded rib I'd make upward strokes in one direction across about 3 Inches of built up coils, and then go back over the entire area in a more diagnal direction. I started on the inside of the pot - not really for aesthetics, but for insurance that it was structuraly sound - and kept my hand on the outside to help compress as well as shape the pot. After, I went over the textured area with a metal rib in a million directions, and repeated this for the outside. Once I began gaining height i used a heat gun to help stiffen the clay so it could support the weight and the pull of gravity. I tried stuffing it with newpaper for a while, but as I anticipated, I learned this wasn't a good solution because it maintained the wetness inside. Using the heat gun i had to proceed with caution because evenness is a must to avoid cracking which was a difficult job as the shape of the opening would shrink or grow.


When this thing finally made it to the top, I just coiled for as far as physically possible and with about a 2 inch wide hole at the top, I diagonally cut the lid out and placed it on a piece of egg-carton to maintain its shape. I attached a little cap to it and added some more trailing bubbles on top to create a handle!

The Coral


The coral pieces are actually way more simple than they appear. I began by rolling out some cubby coils and kind of pounding them lightly on the table to fatten up the ends. Next, I used the end of my metal needle tool to create a dimple in the top, or on the sides.


While I handled the clay wasn't afraid of leaving dents of imprints in it because I needed it to feel organic. I used the pointed end of the tool to add a coral texture to the craters and a few other areas of the tubular coral. My piece of coral was super textured and had a lot of grains of sand smashed into those tiny holes and I felt like it gave it a lot of character.

Of course underwater, coral wouldn't have sand shoved in these tiny holes because it was probably forced there by waves clobbering it consistently against the shore. ANYWAY. Here's a shot of the real coral so you can compare it to the clay coral. :]

The "flare" coral, as I call it, was super easy too. Basically you pick up a blob or coral and pinch together small amounts while pulling it upwards and twisting at the same time. I got this idea from Jen in my class, she used it to create the waves in her projects. When these pieces are pinched, the edges tend to crack and when they did, I just went back over them with my finger to smooth it back over.


The clay for both types of coral was fairly moist, so to attach I scored the surface I was attaching it to and brushed a tiny amount of water on the clay and kinda wriggled the pieces into place. Sometimes I just kinda jammed a hunk of coral onto the side and built the flare coral that way so I could have more precision and maintain the shape i wanted, because attaching those pieces caused deformities that i wasn't particularly fond of.

The Seaweed and Other Finishing Touches


The seaweed is probably my favorite part of the entire piece. I really love the flow and softness it offers to such a large pot. To make the seaweed, I rolled out a fairly thin slab and cut some seaweed-y shaped blades. I let them set for about 30 minutes on their sides so I could bend them into the perfect shapes. I was really excited about bring the free floating quality of movement to the clay seaweed, the same way water does to living seaweed. Once those began to harden i went back and used a mini ribbon carving tool to create the vein down the middle that you find in plant life.

To attach the seaweed, I waited until they were at a fairly hard state to keep the shape. I modeled the pieces where I wanted them to go and also marked where exactly I needed to score. I used a thick slip because I wanted to avoid adding too much moisture to these delicate pieces. I was determined in keeping the viewer interested from 360 degrees so adding these naturally trailing bubbles was the perfect touch. My favorites were the ones trapped beneath a piece of seaweed. I felt like those bad boys were so tiny but did so much for the big bubble. To make these, I did exactly what you think I did, rolled up Coco Puff sized balled and attached them using a thick slip and scoring.

And that's how it's done! Stay tuned for some insight to glazes: Test tiles, choices, and insight into what glazes make up this aquatic wonderland!

Thursday, March 10, 2011


How to Build a Where the Wild Things Are Reliquary

Overall Goal:

I wanted to create a reliquary based on my favorite book Where the Wild Things Are, by using a figurine I have of one of the characters from the book. When the reliquary project was introduced I had this image in my head of the arm of the character from the elbow up with the hand tilted back with Max’s crown sitting in the palm of the hand. I wanted to recreate the stripes on the arm as separate compartments with the hand as a separate attachment. I wanted to create the arm as if it were a puzzle because of the significance the book had to me as a child and the idea of a puzzle relating to childhood and playfulness. I wanted to create the crown to look like a paper crown a kid would make. I wanted the hand to look very rough and monster like with long curled up claws.

1. I started by building the top section of the arm by creating a slab about a ¼ of an inch think about 4-5 inches wide making the length on one side shorter than the other to create a smaller opening on top than the bottom

2. I then created another slab in the shape of a circle with about 4 ½ inches in diameter

3. I then created another slab in the shape of a circle about 2 inches bigger in diameter

4. I then created another slab about 4-5 inches wide with the length slightly longer then the length needed to wrap around the bottom

5. I repeated step 4 and 5 for the bottom section of the arm.

6. I then used the process of scoring and slipping, which is a process used to join clay together by creating openings in the areas being attached by scraping fine lines in various directions and then applying a layer of slip which is a paste of glue like clay or using water

7. I scored the areas on the bottom of the slab that would be the forearm and the top edge of the circle slab I then applied slip and wiggled them into place to secure the attachment using pressure

8. I then trimmed the edges to match up and have the right angle, I scored and slipped the ends of the slab that would attach together

9. I repeated step 7 and 8 for the middle section to match up to the top section.

10. I repeated steps 7 and 8 for the bottom section to match up to the middle section

11. Once the sections of the arm matched up and fit together I applied a flange under the bottom of the upper section and middle section by cutting out a circular slab that was slightly smaller than the inside of the sections it would fit into and I applied the flanges by slipping and scoring the areas together

12. I then created the hand by building the clay around my own hand for the palm and then built the fingers and thumbs separately and then the claws I then attached the fingers to the rest of the hand by using coils and working the clay together

13. I then aligned the bottom of the hand with the top section of the arm

14. I then created the crown by rolling out a slab about a ¼ of an inch thick and then cut out a rectangle about 6-7 inches wide and over a foot long

15. I slipped and scored the edges before attaching them together to form a cylinder

16. I then cut out an uneven zigzag pattern to give the illusion it was a paper crown cut out by a child

17. I then went and smoothed all the surfaces of the arm and crown with a rib

18. I rolled out slabs of clay about an 1/8 of an inch thin and then cut out strips of slabs about an inch wide and as long as I could cut it, I then cut out small triangles from the strips to create the scale texture for the arms

19. Starting from the bottom up to create the correct layered effect, I started attaching the scales in rows closely overlapped until the entire surface was covered with scales

20. I realized the hand was too heavy to support itself, so I realized the need for additional support for the hand, I created a faux book end as a support, by rolling out a slab about a cm think I cut out a rectangle 3 inches wide about 17 inches tall and another rectangle about an inch and a half wide and 4 ½ inches in length for a bottom for the book end

21. I then created an indentation for the bottom of the hand for the top of the book to slip into and another indentation for the bottom of the book in the stand for the book

22. To create the texture on the hand once the hand was dried out more I used my needle tool to scrape a texture into the hand using a cross hatching pattern to give it the texture of age and roughness

23. I used the needle tool on the fingers as well but only using lines running along the length of the fingers

24. I left the claws smooth and the crown smooth

25. I used the needle tool to carve into one edge of the book to create a page texture

26. I left the front of the book smooth in order to apply the decal of max

27. I cleaned up all edges and surfaces before firing

Final Glaze Map:

Bottom and top section of arm: 3 coats of majolica sprayed + 2 thick coats of Vivid orange sprayed

Middle Section of arm: 3 coats of majolica sprayed + 2 thick coats of Canary yellow sprayed

Hand: 2 coats of excellent black + 2 coats crawl brushed on roughly

Nails: 2 coats of majolica + 2 coats straw stain brushed on

Crown: 2 thick coats of majolica sprayed + 2 coats of yellow stain sprayed

Book end: 3 coats of majolica brushed on + 2 coats of Blue majolica brushed on; the decal was applied post firing and then refired

Decal:

I print out an image of max I wanted from the book, I then copied the outline and then drew into the image using a fine micron pen and then scanned the image into photoshop and shrunk the image down before printing the image onto the decal paper I then applied the decal on the surface of the book and it was fired again